If you open Snip & Sketch from the Start menu or by searching for it, it will open the Snip & Sketch window instead of the small panel at the top of the screen. From here, you need to click the New button in the upper-left to initiate a screen capture and open the small panel. It’s an extra step to proceed this way, but it also lets you delay a screenshot. Click the down-arrow button next to the New button to delay a snip for 3 or 10 seconds.
She is proficient in writing articles related to screen recording, video editing, and PDF file converting. Like taking a screenshot of the entire screen, there are also hotkey combinations available for capturing part of the screen. This method seems similar to using the Snipping Tool. However, as this method is simplified, you cannot use some of the advanced functions of the Snipping Tool, such as the free-form snip mode and the annotators. What you captured using this tool can be saved as an image or in HTML format. And Snipping Tool offers you a built-in annotator that helps you draw on the screenshot freely, and you can also highlight the text in the screenshot if necessary.
What Most Businesses Forget About: Make Sure to Keep This in Mind
Consider charging both devices above 15% before creating a connection. This is the most powerful and most complicated option. Instead of relying on Steam or a USB adapter to do the job, you use a software wrapper to translate the Pro Controller’s inputs into a format that Windows 10 can better work with. The Pro Controller should show up on the list of available devices (if it doesn’t, make sure the indicator lights are still flashing back and forth). With the Pro Controller charged, press and hold the Sync button on the top of the gamepad for a few seconds until the indicator lights start flashing.
- You don’t have to use the shortcuts that come with the application.
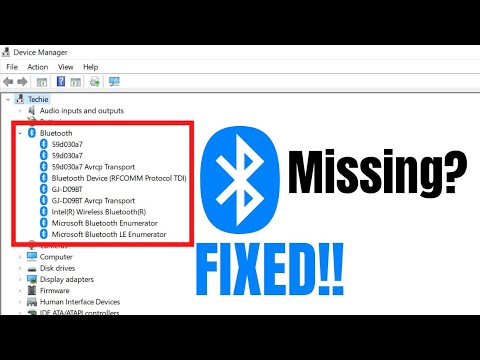
- You can now click on “View more devices” to find a list of your paired devices.
- The very idea of screen recording on Windows can feel intimidating.
The Xbox Game Bar doesn’t serve as a webcam; it will only record screen applications. However, before you get started, you may want to adjust the volume levels of your desktop audio and microphone audio. You will have a number of tools in the mixer tab. This includes a volume slider, a mute button, and a settings button.
Go select the photo and send it to a printer that’s connected to your mobile network to print. To use the Snipping Tool, press the Start key and browse and search for the Snipping Tool. Then hold down the “Alt” and “M” keys to pull up your snipping options.
Method 3 of 8:Taking a One-Window Screenshot
These steps will ensure you’re screen grabbing with efficiency. Perfect for the avid annotator and photo editor, Snagit offers an easy-to-use interface and a number of added features that make screenshotting a breeze. Step 1) Take a screenshot of your current window by pressing the “Windows” and “PrtScn” buttons on the keyboard.
Video producers, YouTubers, trainers, and instructors looking for how-to videos, video demos, and step-by-step instructions find this software valuable. Movavi’s screen recording software is ideal for capturing webinars, meetings, seminars, and lectures. You can choose to screen record your videos using your FTDI USB Serial Port (COM2) drivers download cameras and screens or combine the two. Snagit also offers valuable features like a tool that allows users to document actions quickly, modify the text, and simplify the screen recording process.
Instructions cover Windows 10 desktop and laptop computers. Both free and paid tools from the best screen recording software can be effective methods of capturing the work-related or entertainment activities on your PC. Click the Record button to begin the capture, then press Esc when you’re done. Your recording appears in a preview window where you can edit it, save it as a video file, or upload it directly to YouTube.